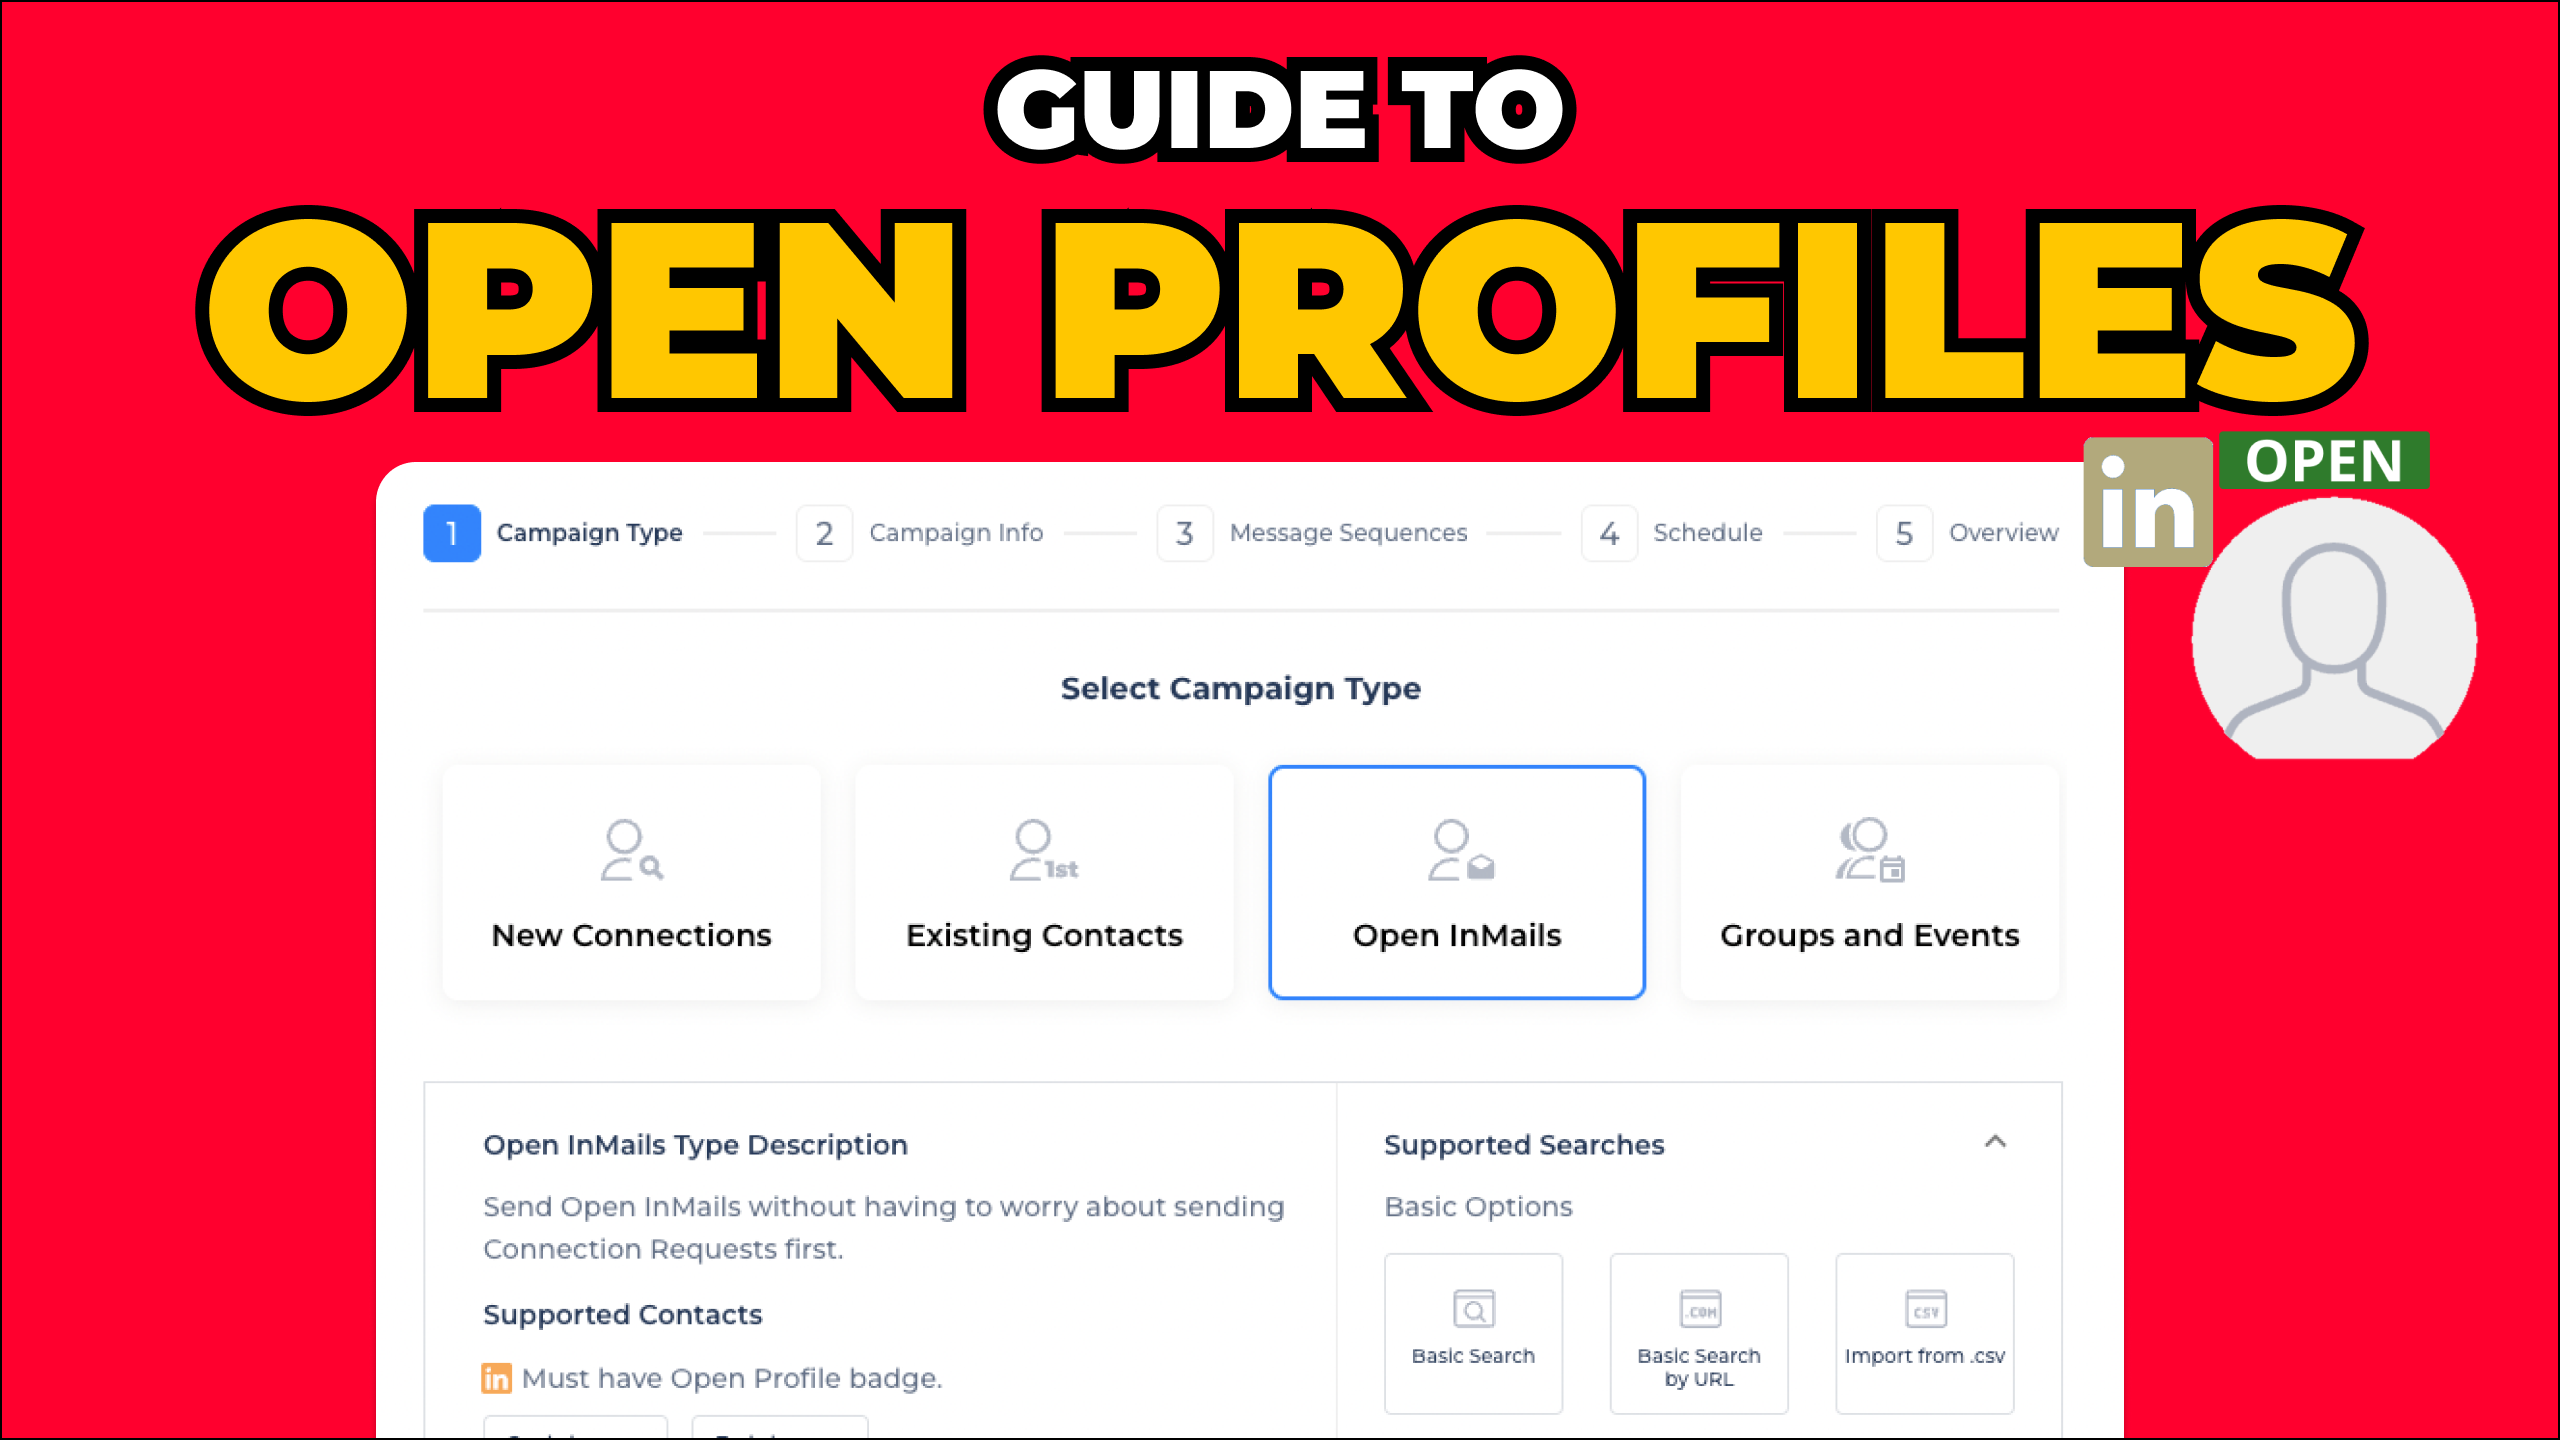
Want to get more out of your prospecting on LinkedIn with extra messaging credits? In this guide, we break down everything you need to know about LinkedIn InMails. Read on to discover how they work, quota allowances, and how to find and connect with Open Profiles to message an extra 800 leads per month.
What is LinkedIn InMail?
InMail is a formal messaging service offered by the LinkedIn platform that can be used to message 2nd and 3rd degree connections. Unlike the standard LinkedIn chat function, which requires users to be first-degree connections, InMail is a way for any member of the platform to message anyone else, even if they’re not yet in the same network.
It’s only available on Premium, Sales Navigator, and Recruiter accounts, but it’s an invaluable tool for anyone that needs to do cold outreach and generate leads.

An Open InMail in the normal LinkedIn inbox.
What does an InMail look like?
InMail is similar to email. Each message requires a subject line, and most are written pretty formally: they have line breaks, begin with ‘Hello’, and end with a proper sign-off.
InMails are a more asynchronous way of communicating than LinkedIn chat – although if a user accepts an InMail message request, they can start interacting with each other in an interface that’s much closer to instant messaging.
Users that receive an InMail request have several options for responding. They can accept the message by clicking the auto-reply button ‘Yes, I’m interested’. This starts a conversation with the InMail sender. Alternatively, they can reply directly with a message of their own, or cut off all communication by selecting ‘Not interested’. There’s also, of course, a final option: ignore the InMail outright.

InMail response options.
Any InMail that gets a reply within 90 days of sending is automatically credited back to the sender’s monthly allowance. So it’s best to do everything possible to get a response. It doesn’t have to be a positive response, either – LinkedIn counts someone hitting the ‘decline’ button as a response for crediting purposes.
If you want to avoid your message languishing in the ether, check out our guide to improving your InMail response rates.
What are LinkedIn InMail credits?
LinkedIn wants to keep its reputation strong and avoid spam, so it heavily limits the amount of InMail messages members can send with something called LinkedIn InMail credits.
At the start of the month, each Premium, Sales Navigator or Recruiter account receives a set quota of monthly InMail credits. For Premium Career members this number is 5, rising to 15 for Premium Business. Recruiter Lite comes with 30 InMail credits a month, and Sales Navigator offers 50.
Each time a user sends an InMail to another member of the LinkedIn platform, their credit number goes down by one. InMail credits can be accumulated month to month, but only up to a maximum of 3-4x the monthly quota. Sales Navigator users can accumulate a maximum of 150 InMail credits.
Basic LinkedIn accounts receive no allowance for InMails but can send connection requests as usual. They can also send Open InMails to members with Open Profiles.
50 credits per month is actually a pretty low figure – hardly enough to carry out a sophisticated sales strategy on LinkedIn. One way to work around this limit and get more InMail credits without any extra cost is to target accounts with Open LinkedIn Profiles.

The format of an Open InMail.
What are Open Profiles on LinkedIn?
LinkedIn Open Profiles are users who’ve opted to allow any other user to message their account for free. You can send them a message right from their profile without it counting towards your InMail quota or connection request limit.
You can easily spot an Open Profile as it has a green badge next to the user’s name.

The Open Profile logo on LinkedIn.
Why do people make their LinkedIn profiles open?
The reasons users set their accounts to open vary, but some motivations include:
1 – They want to make it easier for prospects to reach out to them or engage with their brand. Sales reps or business leaders might choose to open their LinkedIn profiles to make it easier for leads to come to them.
2 – They’re trying to build themselves out as an industry expert or thought leader. Individuals looking to build a personal brand on LinkedIn might keep their profile open to build their network, encourage collaboration, and improve their Social Selling Index.
3 – They like connecting over social media. Some users simply like others having the opportunity to contact them. They’re generally more outgoing and are more likely to engage positively with new opportunities.
Are there any downsides to targeting Open Profiles?
While adding Open Profiles to your campaign types is a great way to bypass restrictive LinkedIn limits, there are a couple of things to bear in mind:
1 – Open Users will be more particular with what they respond to. Remember, these are people who ANYONE can message. They’re likely to have systems in place to quickly spot and decline spam messages. Respect their time by clearly displaying value in your outreach.
2 – You’ll have to search out Open Profiles on your own. To avoid an inevitable deluge of messages, LinkedIn doesn’t offer any options in its basic or Sales Navigator search to filter specifically for Open Profiles. Instead, you’ll have to manually identify these prospects from your search results and add them to a dedicated Sales Navigator lead list.
5 ways Open Profiles improve lead generation
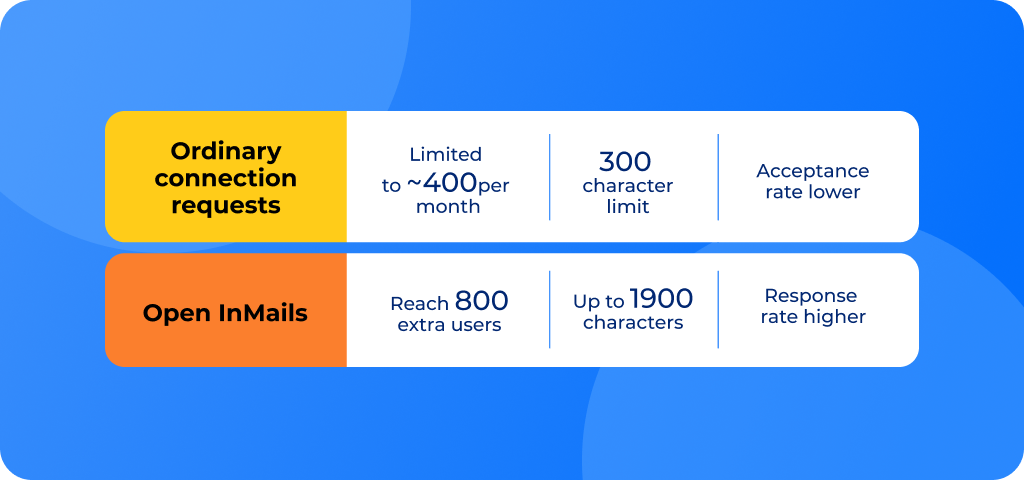
1 – Bypass the connection request limit and reach an extra 800 users a month for free. Open InMails don’t count towards your connection requests or standard InMail quotas. With LinkedIn limiting connection requests to around 400 a month, they’re a vital way to keep prospecting at the necessary scale to see results.
2 – Send messages of up to 2000 characters. Connection requests are limited to 300 characters. InMails can be 6x this length – more than enough space to clearly articulate how your offering adds value and address pain points with some key metrics.
3 – Send messages that stand out. As discussed above, there’s currently no way to automatically gather Open Profiles into campaign lists. They’re also sent from the basic LinkedIn interface, not using the Sales Navigator inbox. Because of this, these accounts are actually LESS likely to make it into outreach campaigns. Meaning your message has a better chance of standing out and converting.
4 – Create dedicated Open InMail campaigns. Using Salesflow, you can upload a list of LinkedIn leads, filter for users with Open Profiles, and run automated outreach cadences.
5 – Set your own profile to Open. Users with a Premium LinkedIn account can improve their social selling by changing their own account settings to ‘open’. To do so, turn on Premium Profile visibility from LinkedIn settings.
Increase your LinkedIn credits by targeting Open Profiles
Using LinkedIn alone, there’s no way to filter searches for a list of Open Profile users. However, you can run a regular Sales Navigator search and scan the list manually. Once you have a dedicated lead list, you can import your selection of Open Profile prospects into Salesflow for effective LinkedIn automation campaigns that scale.
Here’s how to create a lead list using Sales Navigator:
Step 1: Do a Sales Nav search for your ICP. Filter for things like Title, Industry, and Seniority to get the most relevant results.

Sales Navigator filters.
Step 2: Search the results list for users with an Open Profile sticker. Open Profiles have a gold badge next to their name in lead lists. If you click on the profile, you can also see the green ‘Open Profile’ sticker next to the user’s name.

The Open InMail LinkedIn Premium badge.
Step 3: Add these leads to an ‘Open Profile’ lead list. Create a new lead list to store any Open Profiles you find. If you’re running several campaigns, you could segment these further according to industry or role.
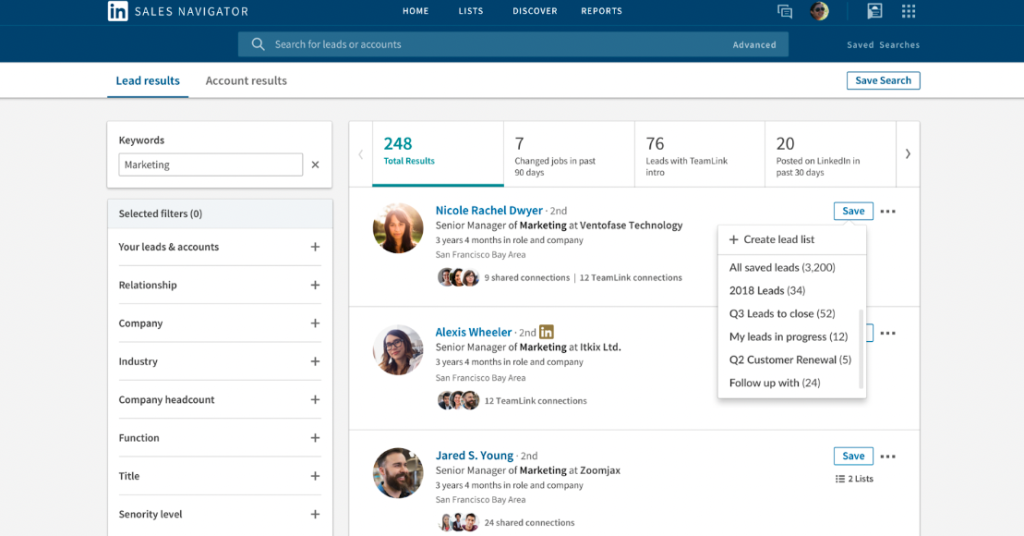
Create different LinkedIn lead lists for each campaign.
Step 4: Build out your list over time as you come across other open profiles. As you’re browsing LinkedIn or LinkedIn Sales Navigator, add any other relevant leads you come across in shared Groups and Events, or via your LinkedIn Feed, to your Open Profile lead list.
An easier way to find Open Profiles using Salesflow
Want to save time when creating your lead lists?
If you’re short on time or don’t want the hassle of filtering your existing lead list, you can use an ordinary LinkedIn or Sales Navigator search and let Salesflow’s software automatically filter out the Open Profiles for you.
Salesflow’s Open InMail campaigns will automatically import only the users with Open Profiles into the cadence.

Save time and remove the need to manually filter lead lists by importing contacts straight into a Salesflow Open InMail campaign.
Using LinkedIn Open InMail campaigns with Salesflow
Adding Open Profile users to a Salesflow Open InMails campaign lets you message 800 additional leads a month at no extra cost.
For this next step, you’ll need a Salesflow account. If you don’t already have a Salesflow account, book a demo with our automation specialists.
You can add contacts to your Open InMail campaign from a basic LinkedIn search, CSV import, or Sales Navigator search. In the tutorial below, we’ll use a Sales Navigator lead list like the one created above. However, users without Sales Navigator can also use Open InMail campaigns.
How to create a Salesflow Open InMail campaign
Step 1: Log into your Salesflow account.

Step 2: Select ‘campaigns’.

Step 3: Add a new campaign.

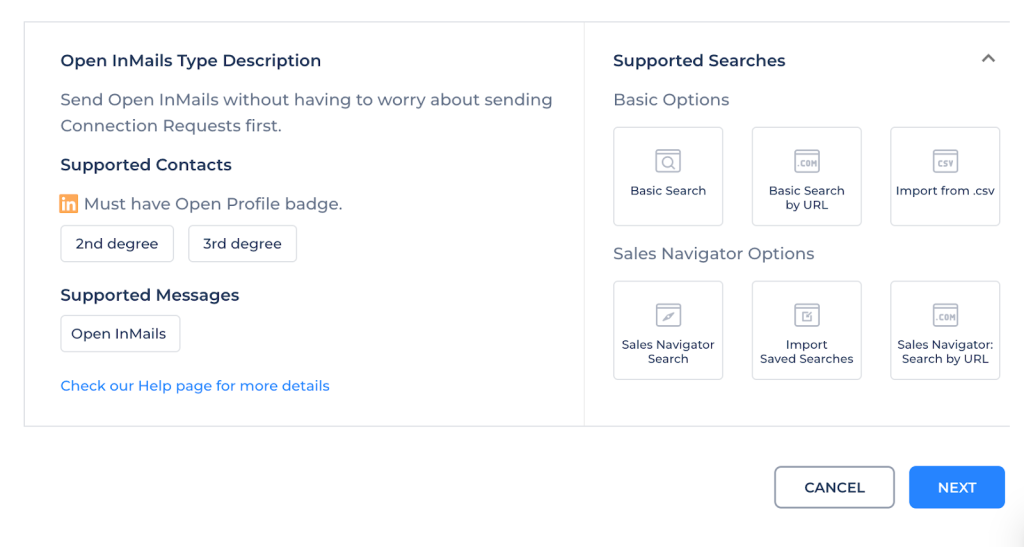
Step 4: Choose ‘Open InMails’ as the campaign type. Contacts added to an Open InMail campaign must have an Open Profile and be 2nd or 3rd degree connections. For first-degree connections, try an existing network campaign.

Step 5: Add a name for your campaign. Choose a title that clearly states its purpose and will be easy to search. For example ‘Open InMails campaign – Sales Leaders’.
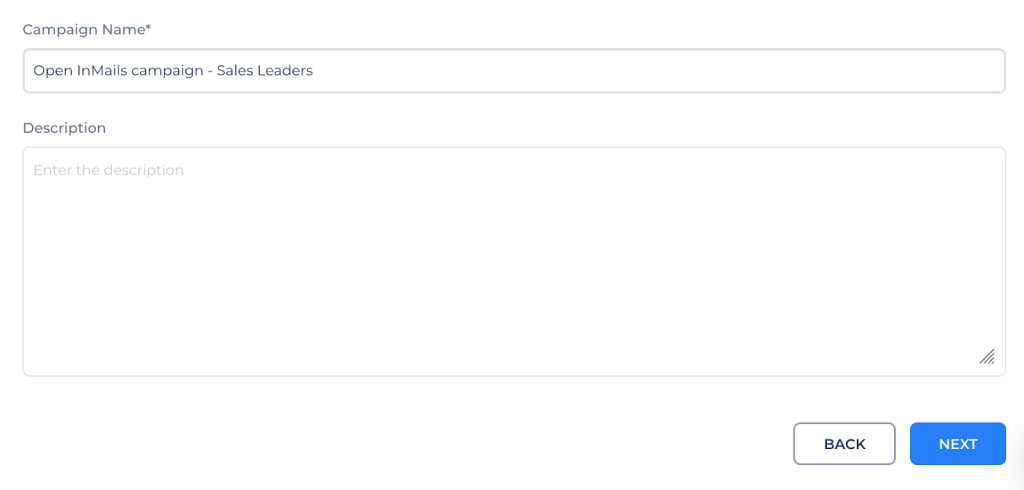
Step 6: Set how many messages to send per day. We recommend sending up to 50 per day, to reach 800 Open Profiles per month.

Step 7: Add your message template. You’ll need to enter an InMail subject line and then the body text. In the body, make sure you address common industry pain points and how your product solves them. Include social proof and key results to strengthen your claim, and consider offering a valuable giveaway before your call to action, such as a whitepaper on industry insights. For more tips on structuring your messages to improve response and conversion rates, check out our guide to LinkedIn InMail best practices.
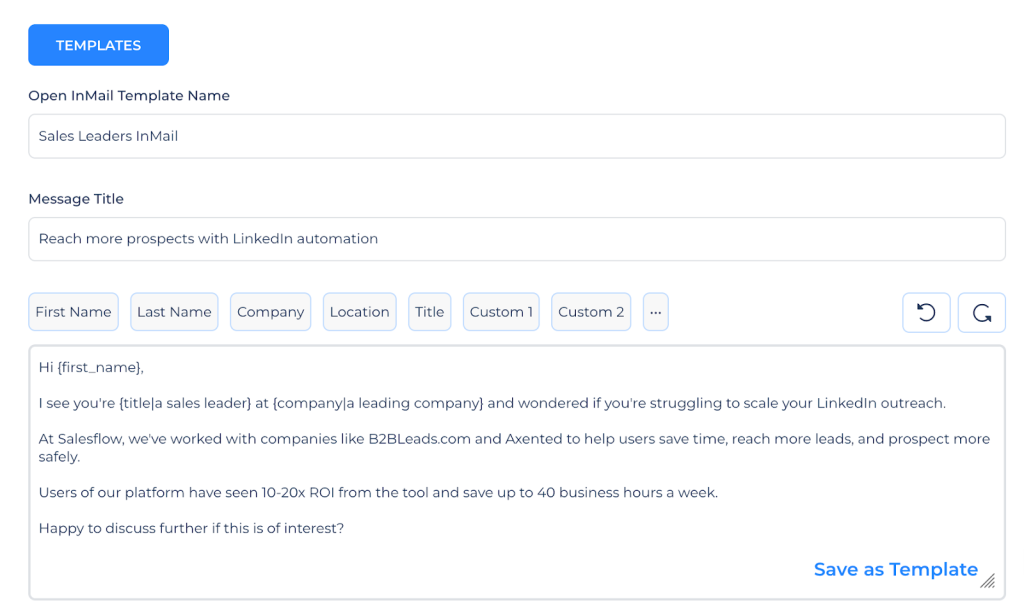
Step 8: Under ‘Send after’, select ‘0’. This will be the only message in the sequence, so there’s no need to set a follow-up cadence.

Step 9: Confirm the campaign schedule. Generally, it’s best to stick to normal working hours between Monday and Friday.
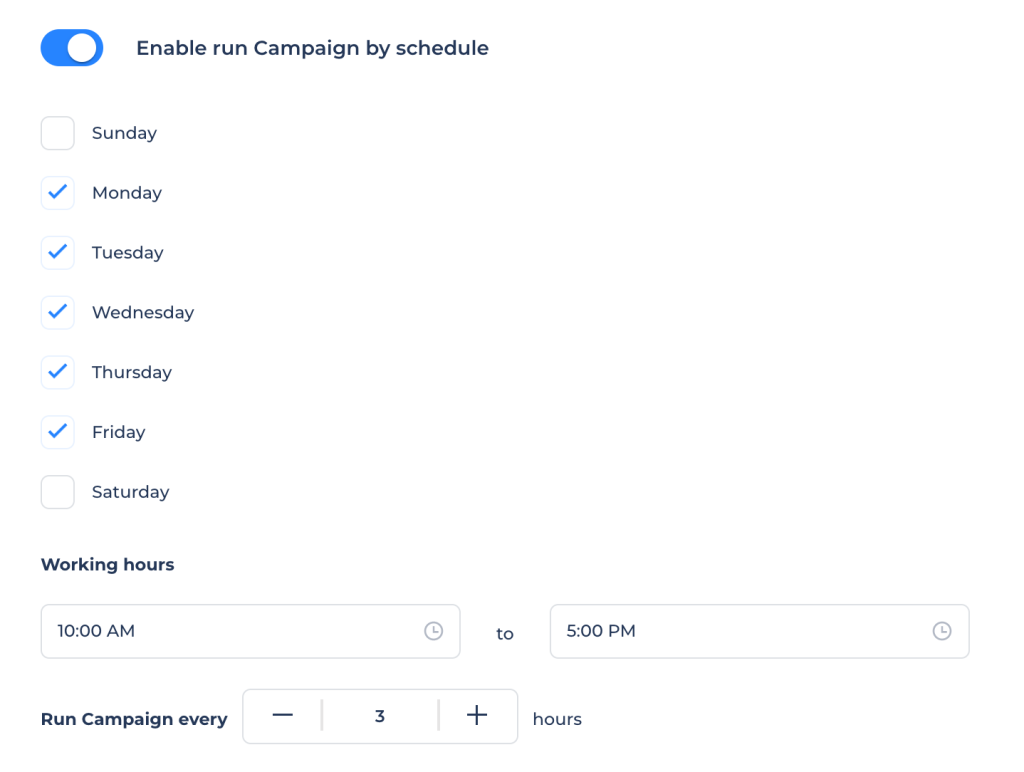
Step 10: Review your campaign. If you’re happy, click ‘create’.

Step 11: Add your Open InMail users. Select ‘add contacts’. Under ‘Sales Navigator Options’, select ‘Import Saved Searches’.

Step 12: Select your list and click ‘Add all leads’. Then click ‘import’. The Open Profiles will appear in your campaign, with an orange ‘In’ badge next to the user’s name.

Step 13: Press start to begin your Open InMails campaign. Voila! More leads, without using up precious LinkedIn credits. Salesflow’s Linkedin software will automatically run your InMail campaign in the background of your activities. We’ll also notify you when you get a response, so you never miss a lead.

Want this step-by-step guide as a video tutorial? See our guide to Open InMail campaigns.
Reach more leads, faster
Now you’ve got the low-down on LinkedIn InMails, you can contact 800 more leads every single month, with little to no extra effort.
Once you’re ready to take your InMails further, check out our guide to InMail best practices to improve your response rates.
To benefit from LinkedIn automation at scale and save 4-6 minutes per lead, Try Salesflow for free, 7 days – no card required
Learn how to set up an InMail campaign below:
